

Guidance on river crossings for participants

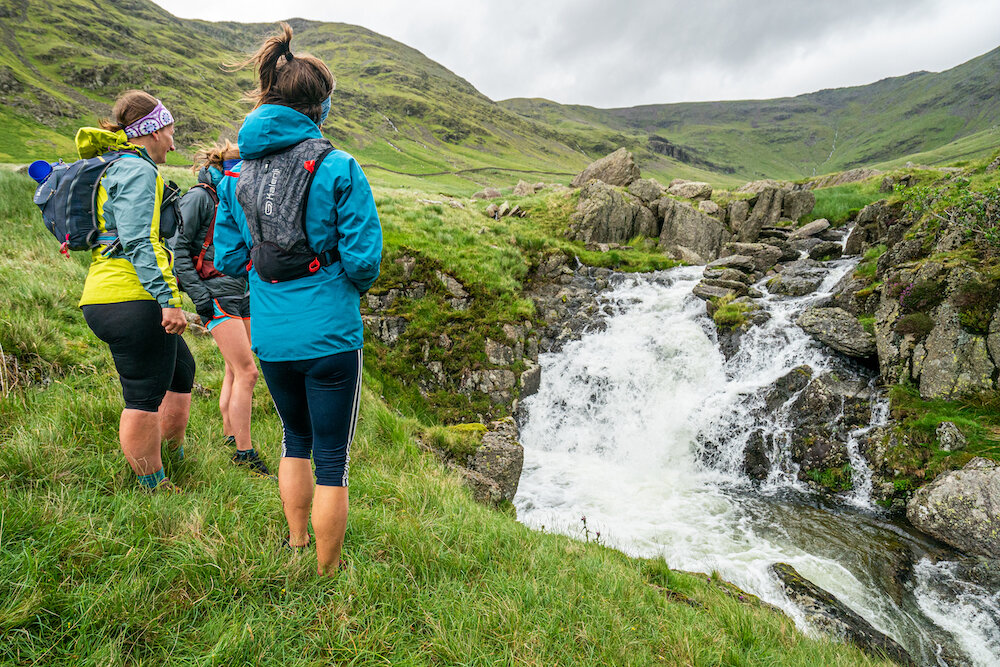
Above: Relative Height 3 - thigh deep. Emma (right - yellow jacket) and Jenny (left - green jacket) crossing a river. Note the under arm, rucksack strap grip and the relative difference of water height between Emma and Jenny. ©Steve Ashworth
We have written the following advice to help you consider your approach to river crossings during the Cape Wrath Ultra®.
This event requires numerous river crossings – generally expected to be shallow wades. However, when river levels rise, there is an increased danger of serious injury and drowning. You should never attempt to cross a river if you believe there is a risk of being swept away.
In Scotland, rivers (large, medium and small - called burns) are well-known for exhibiting remarkable changes in character within just a few hours, during inclement weather. Wet feet would be the least of your challenges!
The River Findhorn, not on the Cape Wrath Ultra® route but representative of Scotland, offers an incredible example of how quickly a river can change from crossable to uncrossable in just three minutes.
The skill and ‘nerve’ range of participants to cross rivers will be varied. Some participants will be well practiced and capable of deeper and faster flowing crossings. Some participants will be unpractised and fearful of some crossings – even if they are not deep. And lastly, some participants might be over-confident, even if the river is deep and fast-flowing.
The following advice is split into four sections:
1) Should you cross?
2) Where should you cross?
3) How should you cross?
4) Preparation and Contingences
Should you cross?
Relative height - What does this mean to me when crossing rivers?
The following advice is designed to inform and offer considerations for crossing rivers at various relative heights.
We say relative heights, because the state of a river will affect you differently depending on your height, weight and build. A shorter, lighter, weaker person will be more noticeably affected by a fast-flowing river.
These relative heights also correspond to the flow strength that these rivers are likely to exhibit at our intended crossing points.
In spate, rivers on the Cape Wrath Ultra® route may not be deep, but they will be fast-flowing - the below graphic and our advice reflects this trait rather than that of a deeper, slower river that will exist off-route.
We would rather that you become competent at shallower crossings rather than risking deeper immersions.
In this advice, we do not consider swimming as an acceptable method of crossing rivers (either deliberately or by accident) and our advice is intended to minimise the risk of being swept away.
“You should never attempt to cross a river if you believe there is a risk of being swept away. If in doubt, it is usually best to head up stream to seek an alternative crossing point.”
There is some margin for independent decision making, as smaller participants may opt to cross rivers in a team with the assistance of larger participants they may be running with.
Above: our graphic showing relative heights when you choose to cross a river

RELATIVE HEIGHT 1
Water height: below knee
Special techniques: none. Participants should be able to cautiously cross rivers of this height without any special techniques or considerations.

RELATIVE HEIGHT 2
Water height: knee deep
Special techniques: participants must cross cautiously and will need to select an appropriate crossing point and may wish to use trekking poles to steady themselves, or group together.

RELATIVE HEIGHT 3
Water height: thigh deep
Special techniques: participants will need to select an appropriate crossing point and will probably need to use trekking poles AND group together whilst crossing. The consequences are likely to be very serious if a participant stumbles or slips.

RELATIVE HEIGHT 4
Water Height: groin deep
Special techniques: participants SHOULD NOT CROSS rivers that are groin deep unless under the supervision of the Event Safety Team. Unsupervised participants finding themselves at a groin deep river crossing MUST STOP racing and seek an alternative crossing location as a group with other participants.

RELATIVE HEIGHT 5
Water height: waist deep
Special techniques: rivers this deep MUST NOT BE CROSSED, even as a group. Seek an alternative crossing location / solution.
To be clear, attempting to cross a river under the conditions shown above is not acceptable or safe. These pictures were taken whilst under the supervision of an experienced Swiftwater Rescue Team.
It is distinctly possible that some difficult river crossings will be encountered. This might occur in the following circumstances:
If there has been a prolonged period of rainfall preceding the event.
If there is heavy rainfall during the event. Mountain rivers and even small streams (in Scotland called ‘burns’) can swell dramatically, and equally, can recede fairly quickly.
If you have gone off-route and are forging a path that we have not specified as the event route.
Cape Wrath Trail video diary - Day 1Cape Wrath Trail video diary - Day 1 *Please note that this video diary is NOT a description of the Cape Wrath Ultra™ race route!*This video diary was filmed in September 2014 when Shane Ohly (Event Director) and his wife, Heather, completed the Cape Wrath Trail. They spent 15 days walking the route, much of which has also formed the Cape Wrath Ultra™ race route. These videos are intended to give potential Cape Wrath Ultra™ competitors and Cape Wrath Trail walkers an insight to the adventure that awaits them.
Posted by Cape Wrath Ultra on Wednesday, 28 October 2015
"This river doesn't look crossable. It was!" (But only after a detour upstream). It is important to note that even minor streams, such as this one (location HERE) could become uncrossable during heavy and prolonged rainfall. In this instance, the river was too wide to jump across, and the power of the water too risky to attempt to wade through at this point as there were also downstream hazards (waterfall and confluence with larger river) that meant being swept away would likely result in a serious injury.
Before approaching a river crossing that looks marginal please remember:
The speed the water travels is very important. Doubling the speed increases the power of the river by a factor of four. Even shallow water flowing over grass – such as on the bankside fringes of a river in spate – can have sufficient power to sweep a participant off their feet.
Remember that just because the person in front made it, doesn’t mean it’s ok, just because you’ve done it in the past, doesn’t make it ok. An extra inch of water depth can make a vast difference to the power of the water.
Bankside collapses cause unintentional drownings. Approach marginal rivers with great caution.
Before attempting a river crossing that looks marginal please remember:
Water is relentless. It will not give you a second chance.
Strainers (such as downstream trees and fences) will drown you.
If the flow is strong enough to sweep you away, rocks in the river will seriously injure you.
All that said, please be aware that the event organisers, during many reconnaissances (in poor weather over many years) have never been totally prevented from crossing any of the rivers on the Cape Wrath Ultra® route. However, some detours of up to 1km were made in the worst conditions, and techniques, such as careful crossing point selection, crossing in groups, and the use of trekking poles for additional security were required.

Above: Emma crossing a river carefully (Relative Height 2 - 2 is Knee Deep) whilst using trekking poles to increase safety. © Steve Ashworth
Where should you cross?


Assess a river crossing (especially downstream hazards) - look for alternative crossing points (is there a bridge marked on the map?) - If in doubt it is usually best to head up stream
River crossing selection point
Do not hurry this task. Study the river. Look upstream and downstream of your position. This might include observing others completing their crossing OR
Consider searching for an easier crossing point upstream where the river may be narrower, or downstream where the river may be wider and shallower. Adopt any workaround that the Mountain Safety Team or Organisers may have explained.
Choose a section of river that is wider (often shallower), has a uniform riverbed, even flow and no deep channels. This can usually be determined by studying the flow form of the water. Often these better locations can be found within just 100 metres of your position.
Avoid crossing where there is a combination of many large boulders and fast-flowing water. One consequence of falling is hitting your head or other injury to the body – this is more common than drowning.
Be aware that undercut banks on the outside of river bends are often unstable and this is where the deepest water may be. Entering the river at these locations can cause an unintended swim, and exiting at these locations can be difficult.
Do not cross above a waterfall or gorge, UNLESS the crossing point is clearly at Relative Height 1. Consider the consequences of a fall and being washed downstream.
Do not cross above a confluence of rivers, especially where a smaller river is joining a larger river, UNLESS the crossing point is clearly at Relative Height Level 1.
Participants should not cross if the river is clearly at Relative Height 4 (unless supervised), and must NOT cross if at Relative Height 5. Other options are to explore up/downstream, wait or turn back.
Do NOT cross above wire fences, trees and branches that may act as a 'strainer' if you are washed downstream, pinning you against the obstruction (and usually then causing drowning).
Consider whether crossing a marginal river could then leave you trapped between other rivers, especially if rivers are rising. This is too complex a scenario to give further advice on, and would need to be assessed by the participant on a case-by-case basis.
How should you cross?
Execution of standard river crossings - top tips
Cape Wrath Trail *walking* insights - River CrossingsCape Wrath Trail *walking* insights - River CrossingsThese three videos were recorded in September 2014 when Shane Ohly (Event Director) and his wife, Heather, completed the Cape Wrath Trail. They spent 15 days walking the route, much of which formed the Cape Wrath Ultra™ race route. These videos are intended to give potential Cape Wrath Ultra™ competitors and Cape Wrath Trail walkers an insight to the adventure that awaits them.
Posted by Cape Wrath Ultra on Saturday, 14 November 2015
Cape Wrath Ultra™ Event Director, Shane Ohly, provides some insights into the challenges of crossing the many rivers found on the Cape Wrath Trail. Filmed in September 2014, the changes to the advice now (Feb 2016) is that participants should always keep their shoes on to cross rivers, even if they choose to remove their socks / GoreTex Socks first and that rock hopping (as done by Shane) is not recommended.
Team Up: Use the assistance of another to cross the river, where possible, and consented. With the stronger participant upstream and making small steps one at a time. This can be completed with any larger number of participants. Firmly holding the rucksack strap below the underarm is better than holding hands or arms. This can be briefly practiced on dry land before starting into the river for real. Solo crossings are still quite acceptable and normal in the lower river height levels. See our graphics for Relative River Heights and explanations at the top of this article.
Use Trekking Poles: Use of trekking poles for river crossings will increase confidence and stability in the water.
Secure your kit: Stow all objects into your pockets, including your paper map, GPS units, gloves and food. Fasten all pockets. Hands should be kept free for best reactions and purchase in case of a fall – unless handling trekking poles.
Shoes should be kept on. It is possible to keep socks dry (if already dry) by removing shoes, then socks, replacing shoes and then crossing the river. We do not recommend crossing rivers with bare feet because the risk of foot injury is greater and rocks are often very slippery.
Be careful and focused: Approach the selected crossing with patience and determination. Ignore the effects of cold water – concentrate on balance and footing.
No leaping: Avoid a method that involves leaping from boulder to boulder when crossing. This can lead to a fall and injury – wet feet are tolerable.
Face Upstream: Face upstream as you cross. In this way, you can study the water more readily, and the force of the water cannot fold your legs at the knees.
Considered Foot Placement: Plant your feet into the river bed between boulders (you will be glad to have your shoes on) rather than attempt to stand on submerged boulders. This will aid stability and avoid falling injury, or full body immersion.
Keep your balance: When in deep faster-flowing water, avoid staring at the surface of water for too long. This can put you off your balance. Instead, look through the water at riverbed features, and occasionally look at the shores to steady your gaze.
Keep your rucksack with you: Do not throw your rucksack across marginal rivers, however narrow. If you were then unable to cross the river, you would then be without your pack and safety equipment.
Secure your rucksack: We advise that you keep your rucksack on and with all belts fastened slightly tighter. This will provide some protection in a fall, and it keeps your equipment to hand. As your rucksack will be fairly small and compact, there is little risk that it will provide additional purchase for strong flowing water, or cause entanglement or weigh you down if you are swept away. In the unlikely event of being swept away, you will need your emergency clothing and equipment.
Do not try to be clever: Participants must NOT devise any ‘roped’ or ‘equipment managed’ methods of crossing rivers.

Above: Janie crossing a river (Relative Height 2 - 2 is Knee Deep) Again note the use of trekking poles. © Steve Ashworth
Execution of challenging river crossings - top tips
When faced with a river that is difficult to cross:
Do not attempt alone: Group together and solve the situation as a team. Intervene and go to intercept when a fellow participant appears to be isolating themselves on a solo endeavour or journey. Watch each other closely, and help each other where appropriate.
Do not pressurise or draw fellow participants into danger: We all have different thresholds for river crossings. Be observant of how your actions influence other participants.
Deviation extent: In worst weathers, deviation distances could be considerable, perhaps over several kilometres. This would mean a significant deviation from the routeline, perhaps into a different Glen (Valley) or over hills. This is another important reason to group together.
Selection of crossing location: Be very selective on location. Study the options and choose a location with the most uniform riverbed and water pattern, and also that is not steep in gradient – do not be drawn to narrow funnels that can possibly be jumped.
Vocal Communication: In noisy environments, generally caused by river noise and wind noise, greater time and efforts must be taken to communicate and to be heard, or that clear gestures used. It is not adequate to shout and wave and believe that your advice or warnings have been heard and understood, not least due to language barriers.
Bridges: Despite general sense and advice to head upstream (which is where bridges are less likely to be found), it is also important to study the map and consider whether there is an option downstream, to cross at a bridge. All known bridges will be mapped.
Race Control have a part to play: Remember that the Race Control will eventually be seeing your deviations from the route, due to the GPS (YB) Tracker. Be attentive to any advice message that might be sent to your GPS (YB) Tracker by Race Control.
It should be stressed that in the two previous of this event, such severe river crossing difficulties have NOT been encountered.
After the river crossing
Look back at your crossing. Have you left any item of equipment or anyone behind?
Should you beckon anyone to your crossing point or should you intervene with others that look to be crossing at a worse location? These will be your options to consider.
In marginal conditions, and before continuing to a potentially more hazardous next river, do you need to reconsider? Are conditions worsening?
After a testing river crossing, you should take some time to gather yourselves before continuing. Are you okay and do you need to address anything immediately? If in a group or with other runners in proximity, should you be together, checking upon each other, and are you all okay? Should you calm and attend to any stresses or nerves. I.e. to seek or to give comfort? Should you pause to change any clothes, especially if hypothermia could become a problem? Should you eat and drink? If you have gone off-route to achieve this crossing, this is when you should study and plan your new ongoing route to get back on track as fluently as possible.
Preparation and contingencies
PRE-EVENT PREPARATION
Most importantly, all participants are experienced and will be expected to make sound mountain judgements, and not jeopardise their own or other people's safety.
A route design that endeavours to avoid river crossing locations that are more often troublesome.
A Mountain Safety Team that may be despatched to known trouble spots and/or known workaround routes. However, in reality this team may not be able to reach multiple locations in any one day, and depending on the spread of participants, and prevailing conditions, may not be deployable for all participants, in all instances.
The advice in this article.
AT THE EVENT PREPARATION
News and advice from our Mountain Safety Team will be displayed each morning during the event (from 0500 in the main mess tent). The day's weather forecast will be displayed the evening before and any meaningful changes highlighted each morning.
Participants may choose to take additional equipment for the whole event and for each respective day stage, if you feel that this may help e.g. trekking poles, waterproof rucksack liner. Participants must not bring or attempt to use ropes of their own to aid river crossings.
Participants may choose to buddy-up with others if they feel that this may help all involved. Buddying-up makes river crossings safer.
River crossing contingencies
We have rehearsed some contingencies (listed below) for perceived troublesome river crossings. It will not be possible to predict them all - far from it. There are hundreds of river crossings and opportunity for issues.
Re-routing: The perceived contingency routings may be pre-mapped, either on your event map, or as information provided at the pre-start of each event day.
Interception: The Mountain Safety Team may meet you and deflect you to a new routing and/or crossing point. Possibly a distant bridge, mapped or otherwise determined.
Managed: The Mountain Safety Team may ‘supervise’ and/or ‘equip’ a crossing of a marginal river. Look for a high-visibility team of staff.
Abandonment of course by the organisers or participants: Very unlikely, but possible in the very worst weather. At worst, this would require the organisers to arrange for diversionary transport logistics to the next overnight camp.
Unknown measures: Be aware during the day that other solutions may have been devised. If in doubt, and if not in danger, the participant should continue along the route to the marked crossing point and expect the ongoing plan to be revealed.
Waiting: It is possible that participants may need to wait before crossing a river. There could be a shelter or bothy of some use nearby. You will all be carrying warm clothes. We will be able to detect stationary and off route participants using the GPS Trackers and this will alert us to any unexpected issues.
SWEPT AWAY EMERGENcies
If you are swept away:
Feet up: Lift your feet up immediately.
Face downstream / feet first: Position yourself to face downstream on your back, travelling feet first.
Protect yourself: Use your feet/legs to cushion yourself against the inevitable collisions with rocks.
Fight to reach the bankside: Make every effort to reach the bankside by paddling with your arms.
Keep your feet up: Do not put your feet down (until you have a firm grasp of the bank-side) as the risk of entrapment by rocks and vegetation is significant.
Good luck. You’ll need it.
Please note that the pictures in this article were taken whilst under the supervision of an experienced swift water rescue team.